


Barley
Grass
Hordeum vulgare L.
Barley Grass is a fast-growing microgreen that’s packed with essential nutrients, offering a mild, grassy flavor. It can be harvested in just 6-10 days and is a refreshing addition to smoothies and fresh juices.
Quick Grow Info:
-
Scientific Name: Hordeum vulgare L.
-
Flavor: Earthy, Mild Grass Flavor
-
Seed Rate: 175g-200g per 10″ x 20″ tray
-
Seeds Per in2: 0.875g-1.0g
-
Pre-Soak: 8-12 Hours
-
Weight Duration: 2-3 Days
-
Germination Time: 2-3 Days
-
Blackout Time: 1-2 Days
-
Seed To Harvest: 6-10 Days
-
Growing Difficulty: Easy
Did You Know
Fun Fact

Barley is one of the top cereal crops in the world, with about 148 million metric tons produced annually. That’s more than 14,000 times the mass of the Eiffel Tower in France, which is 10,100 metric tons!
Plant Details &
Grow Guide
How To Grow Barley Grass Microgreens
Barley grass microgreens are most popular with smoothie and juice enthusiasts! They offer a nutritious and vibrant boost to all your favorite smoothies and juice recipes.
With a quick growth cycle of just 6-10 days, these tender greens boast a grassy, slightly earthy flavor that complements all your favorite juices. Making them an ideal choice for both beginners and seasoned growers. Let’s get started!
Step 1 Preparing Your Barley Seeds
First, you need to measure your seeds using a scale. The best seeding rate for a 10″ × 20″ tray is 200-220 grams. If you plan to grow them in a 10″ × 10″ tray then simply divide the total amount by two, in this case, 100-110 grams.
If you’re a renegade like me you can just eyeball it without weighing, you don’t have to worry if the seeds are touching one another!
Once you’ve measured out your seeds I recommend you wash and pre-soak them regardless if they’re hulless or hulled. Hulled barley grass seeds have had their outer hulls removed, which can make them slightly easier to handle and plant.
Hulled seeds tend to germinate and sprout slightly faster since the removal of the hull allows for quicker water absorption. I prefer to soak them in mason jars for about 8-12 hours, then dump the water and rinse them twice daily, once in the morning and once at night until they start to germinate and the seed radicle has protruded from the seed.
Step 2 Sowing Your Seeds
Fill your tray with your preferred medium, it can be soil, potting mix, coco coir, etc, leaving 1-2cm of empty space from the tray edge to the soil level.
Leaving a small space between the tray edge and grow medium helps when it comes to harvesting, minimizing the chance of digging into the medium with your knife.
Mist your medium with a spray bottle so it’s damp but not saturated and finally spread your seeds evenly across the medium making sure they’re evenly spread out. Lastly, mist your seeds so they’re all covered with a fine mist of water.
Step 3 Germination & Weight Period
Grab an empty tray with no holes and place it on top of your sowed seeds. I use a 15lb (6.80kg) paving block for 10×20 trays or a 7lb (3.17 kg) brick on 10×10 trays. If you don’t have anything to weight your tray down, use 2-3 1.5l -2l plastic juice bottles filled with water to weigh your top tray down.
This helps the seed radicle to bury into the medium when it emerges. Without weight, the radicles have a tougher time digging into the growing medium.
Keep in mind that the seeds will germinate while they’re covered and weighed down. A lot of people confuse the germination and weight period to be independent of one another and that you add them together, this is incorrect.
The germination time is there to give you an idea by what time the seeds will germinate, but you don’t add the germination time and blackout period together.
While your seeds are germinating and are weighed down you will need to keep your medium moist. You can do this by lightly misting your seeds every 12 hours, once in the morning and once at night.
Step 4 Blackout Time
After 2-3 days of weight period, the seeds should have germinated and the seedlings should now be lifting the tray with the weight in it. It’s now time to remove the weight and start the blackout period.
Take out the weight from your empty tray and flip it upside down to create a blackout dome and place it back over your seeds.
Keeping them in the dark for 1-2 days will force the freshly sprouted seedlings to stretch and search for light allowing them to get some height.
You can now start bottom watering your barley grass microgreens. To do this you simply add water to your bottom drain tray. I personally add 1 cup of water twice a day (every 12 hours), once in the morning and once in the evening.
When the 1-2 days of blackout time have passed you can remove the top tray/blackout dome and introduce your barley grass to light. I’ve found that 17 hours under lights and 7 hours with the lights off work well for me.
Grow your barley grass anywhere from 6-10 days, following with daily watering of 2 cups per day, once every 12 hours.
Step 5 Harvest
Harvesting your barley grass microgreens is easy and you only need a sharp knife. I personally love and recommend the Green Mercer Produce Knife. But if you prefer scissors, that’s also completely fine; just make sure they’re sharp!
Now, here’s an important tip to keep your harvest pristine; make sure to keep your chosen tool (whether it’s a knife or scissors) away from the soil! It’s imperative in avoiding any accidental contact between the blade and the soil, you don’t want any unwanted dirt from sneaking into your microgreen harvest and contaminating it.
By following this important pointer, you’ll ensure that your harvested microgreens are of top notch quality and purity.
Plant Details & Taxonomy
Barley Grass (Hordeum vulgare) is a versatile and highly nutritious plant.
Its slender and vibrant green blades add a touch of freshness to any space.
Barley grass is known for its rapid growth, making it an excellent choice for beginners and experienced growers.
With relatively low maintenance requirements, it’s an ideal microgreen variety to start with.
The seed weight of barley grass is typically around 8 to 12 seeds per gram.
Barley grass offers a unique flavor profile, characterized by its fresh and mild grassy taste.
Whether you’re looking to enhance smoothies or simply juice them, barley grass will not disappoint.
| Rank | Scientific Name |
| Kingdom | Plantae – Plants |
| Subkingdom | Tracheobionta – Vascular plants |
| Superdivision | Spermatophyta – Seed plants |
| Division | Magnoliophyta – Flowering plants |
| Class | Liliopsida – Monocotyledons |
| Subclass | Commelinidae |
| Order | Cyperales |
| Family | Poaceae – Grass family |
| Genus | Hordeum L. – barley |
| Species | Hordeum vulgare L. – common barley |
| Common Names | Barley, Common barley, Winter barley, Scotch barley, Hordeum (Latin), Grain barley, Cereal barley |
Microgreen Pests & Diseases
The following are the most common pests and diseases that can affect your microgreens.
White Mold – Sclerotinia sclerotiorum
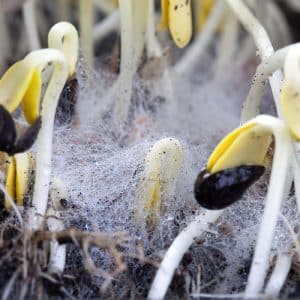
Sclerotinia sclerotiorum is a necrotrophic fungal disease that causes what’s known as white mold, it can infect over 400 plant species worldwide. It’s also called cottony soft rot, stem rot, watery soft rot, crown rot, and seedling blight.
S. sclerotiorum key properties are its ability to create sclerotia which are its black resting structures, and mycelium which are the white fuzzy spiderweb-like growths you see on stems and growing medium.
Damping Off
Damping-off is an umbrella term that covers fungi and fungi-like organisms in several genera including Rhizoctonia, Botrytis, Phytophthora, and Fusarium, with the soil fungus Pythium being the often culprit.
Damping-off is a soil-borne fungal disease that affects seeds and seedlings typically by rotting of the stems and roots at and below the soil surface.
When a seed germinates the seedling will emerge fine but within 24 hours to a few days will become mushy and water-soaked, collapse at the base of the stem and die.
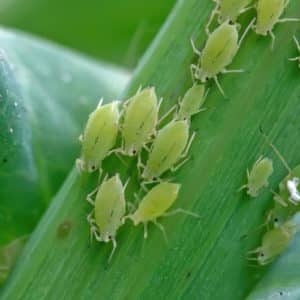
Aphids – Aphidoidea
Aphids suck! Quite literally. They’re soft-bodied insects that use their piercing-sucking mouths to feed on plants and there are over 4,000 aphid species in the world.
Other common names are greenflies, blackflies, and plant lice. They come in varying colors such as light green, black, white, brown, gray, or yellow.
When aphids feed on plants they secrete a sticky fluid which is called honeydew (no, don’t eat it). This goo they leave behind drips onto plants and can attract other pests such as ants. If the honeydew is left on leaves it can promote black sooty mold.
Barley Grass Nutrition Facts
Barley Grass microgreens are a highly nutritious food, packed with 354 Kcal per serving.
They are an excellent source of carbohydrates, protein, and essential vitamins and minerals, including iron, magnesium, and zinc.
They are also high in dietary fiber, promoting digestive health.
Although they don’t contain Vitamin C, they are rich in phytonutrients like beta-carotene and lutein + zeaxanthin.
Incorporating barley grass into your diet can be a great way to enhance your overall health.
| Principle | Nutrient Value | Unit | RDA |
| Energy | 354 | Kcal | 18% |
| Carbohydrates | 73.5 | g | 57% |
| Protein | 12.5 | g | 22% |
| Total Fat | 2.3 | g | 4% |
| Cholesterol | 0 | mg | 0% |
| Dietary Fiber | 17.3 | g | 46% |
| Vitamins | |||
| Choline | 0 | mg | 0% |
| Folate | 19 | µg | 5% |
| Selenium, Se | 37.7 | µg | 69% |
| Vitamin A | 1 | µg | 1% |
| Vitamin B1 (Thiamin) | 0.646 | mg | 54% |
| Vitamin B2 (Riboflavin) | 0.285 | mg | 22% |
| Vitamin B3 (Niacin) | 4.6 | mg | 29% |
| Vitamin B-6 (Pyridoxin) | 0.318 | mg | 24% |
| Vitamin C | 0 | mg | 0% |
| Vitamin E | 0.57 | mg | 4% |
| Vitamin K | 2.2 | µg | 2% |
| Electrolytes | |||
| Sodium, Na | 12 | mg | 0.80% |
| Potassium, K | 452 | mg | 9.62% |
| Minerals | |||
| Calcium, Ca | 33 | mg | 3.30% |
| Copper, Cu | 0.498 | mg | 55.33% |
| Iron, Fe | 33 | mg | 412.50% |
| Magnesium, Mg | 133 | mg | 32.44% |
| Manganese, Mn | 0.498 | mg | 21.65% |
| Phosphorus, P | 264 | mg | 37.71% |
| Zinc, Zn | 2.77 | mg | 25.18% |
| Phytonutrients | |||
| β-Carotene, beta | 13 | µg | 0.33% |
| α-Carotene, alpha | 0 | µg | 0.00% |
| Lutein + zeaxanthin | 160 | µg | 2.67% |
Recommended Products
Explore my top curated picks for products needed to grow microgreens. Rest assured that all the featured items and products have been meticulously put to the test by me or have received glowing recommendations from my esteemed readers.
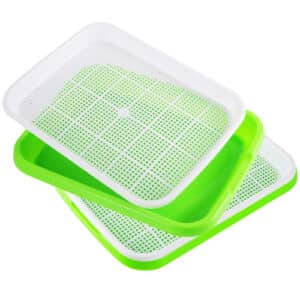
Microgreen Grow Trays
For my personal home use, these microgreen trays are my go to. Measuring around 12.2 x 9.06 x 1.77 inches (31 x 23 x 4.5 cm), these trays are perfectly suited for cultivating microgreens in a home microgreen grow room. What’s more, they’re durable, and cleaning them is a walk in the park, making them an all-around convenient choice.
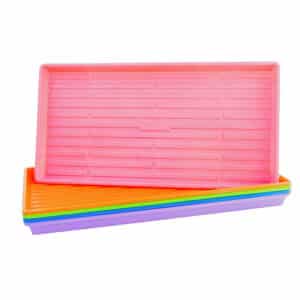
1020 Microgreen Trays – Shallow Extra Strength Colors
Industry leading BootStrap Farmers 1020 microgreen trays! Designed with long lasting durability in mind, these colorful trays are built to withstand years of use and abuse. With a height of 1¼ inches (3.2 cm), these shallow trays make harvests easy, saving you time and increasing your yield. The trays come equipped with 36 drainage holes that effectively remove excess water, promoting a healthy growing environment and preventing mold growth. If you’re serious about growing microgreens and want the best trays available on the market, these trays are it!
